Showing posts with label Cleaning. Show all posts

Sunday, August 4, 2013

how to mix Shaklee’s Basic H2 cleaner and how it saves you money

Today I wanted to hit on how easy it is to mix Shaklee’s Basic H2 cleaner and how it will save you a ton of money in cleaning products {not to mention saving the environment at the same time}.

Lead Image

When you purchase a bottle of Basic H2 cleaner, you are receiving a 16 oz bottle of double concentrated formula that can be mixed to create all of the cleaning power you need for your household.

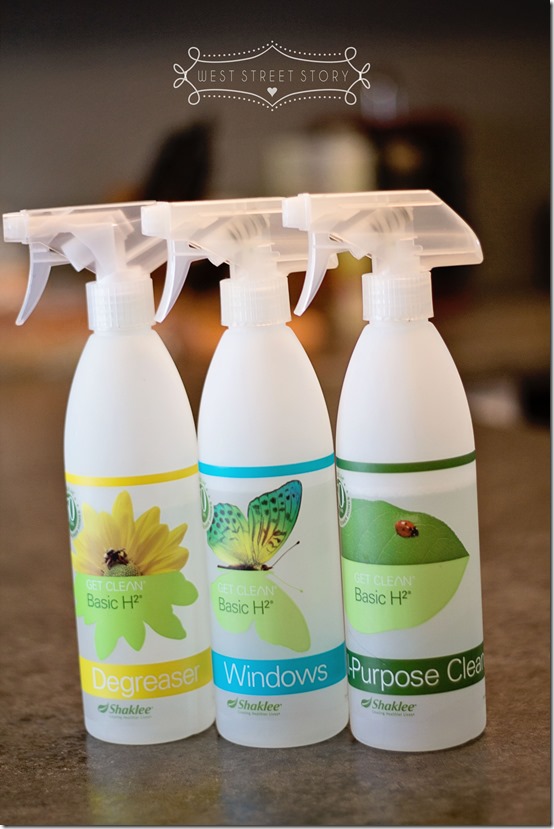
If you are purchasing the Basic H2 cleaner for the first time, I also suggest investing in the 3-pack of reusable bottles.  With this 3-pack, you will receive a bottle to mix an all-purpose cleaner, window cleaner, and degreaser in {but please note that the Basic H2 cleaner can be used for MUCH more than just these three types of cleaners}

bloguntitled34August 04, 2013

I would like to emphasize that these three bottles are REUSABLE….you will save thousands of plastic bottles from ending up in the landfills each time you mix your cleaner in these!

An added bonus, the recipe for Basic H2 concentrate + water is printed right on the side of the bottles.  No need to try and remember!  Plus, the colored lines across the top of the bottle represent how much water to add, so really there isn’t a whole lot of measuring that you actually need to do.

bloguntitled38August 04, 2013

The three basic formulas, that would represent the cleaners in the refillable spray bottles are as follows:

For all-purpose cleaning:
Add 1/4 tsp. to 16 oz. of water


For windows and mirrors:
Add 1-2 drops to 16 oz. of water


For degreasing:
Add 1 1/2 tsp. to 16 oz. of water.

For bigger jobs {like cleaning your floors}, add 2 oz. to 1 gallon of water.PDF Page 2

If you have already done the math, you can easily see how much money you will save by switching to Shaklee’s Basic H2 cleaner.  I mean, you only need two drops of the Basic H2 concentrate to make your window cleaner! 

Here is an example for you – the 16 oz bottle of Basic H2 concentrate mixes 5,824 bottles of window cleaner.  If you went out and purchased 5,824 of that blue window cleaner, you would be spending MUCH more than you did on this one bottle of concentrate {Shaklee’s Basic H2 16 oz bottle is currently $12.15 retail or $10.35 for members}.

Another example – the 16 oz bottle of Shaklee’s Basic H2 concentrate can mix 48 gallons of all-purpose cleaner!

Not to mention, you will have saved 5,824 blue window cleaner plastic bottles from ending up in the garbage. 

And did I mention that Shaklee’s Basic H2 cleaner is nontoxic, natural, and utilizes biodegradable surfactants?  You can use Shaklee’s Basic H2 cleaner on any washable surface, inside and out and it is safe for your kids to use while helping you clean!

I have been using my Basic H2 cleaner, mixed in my three reusable bottles, on everything.  It certainly works just as good, if not better, than any “traditional” cleaner I have used in the past. 

The one thing I did miss initially was the “clean” smell {which was just a chemical smell, but something I associated with “clean”}.  To solve that problem, I now mix essential oils in with my cleaners.  Each type of cleaner now has a new, fresh smell such as orange, lavender, or lemongrass!  I use this essential oil sampler pack found on Amazon.

Do not worry, I will have more posts to come on how versatile Shaklee’s Basic H2 cleaner is {and how many different ways I use it to clean}.  Today’s post was more to show you that the cleaner really isn’t that expensive…..and that, in fact, it is much LESS in cost than what you are using now.

Not to mention how much SAFER it is for you, your children, and your pets!

PDF Page 1

Like I mentioned above, if this is your first time purchasing a bottle of Shaklee’s Basic H2 cleaner, I would HIGHLY suggest getting the reusable bottles as well. 

The best way to get started with Shaklee’s Get Clean products is with one of their Get Clean Starter kits.  Shaklee offers a variety of wonderful cleaning kits, with a great mix of all different products.  My favorite, of course, is the fragrance free kit {so that I can add my own fragrance via essential oils}

However, if you are looking for something a little more basic, just to get started with the Basic H2 cleaner, make sure to check out the Get Clean Household Mini Kit that includes a bottle of Basic H2 cleaner and the three reusable spray bottles.  It also comes with the Scour-off Paste which you will absolutely LOVE….it has basically replaced all of my Mr. Clean Magic Erasers {more to come in a future post}!

Not sure what the difference between “member price” and retail price is?  Let me break it down for you. 

You are either a member of Shaklee and save at least 15% off the retail price on all purchases, or you simply pay full retail price.

To become a member, there is a one-time fee of $19.95.  This is for a LIFETIME membership with Shaklee.  There is never a renewal cost, and you will always pay the member price on anything you purchase for the rest of your life!

And it wouldn’t be fair of me if I didn’t mention that there are actually ways to get your lifetime membership for FREE!  You become a lifetime member of Shaklee, for free, with the purchase of a Vitalizer or a Shaklee 180 kit {either the turnaround or the lean and healthy kit}.  If you are looking to lose weight, get healthy, AND become a lifetime member of Shaklee {saving at least 15% on all purchases}, then this would be the way to go!

Okay, now, remember in my “why I love Shaklee” post a few days ago I mentioned I had some hefty goals for myself?  Here is the first one! 

I want 10 different households to try Shaklee’s Get Clean products by the end of August.  Will you be one of them? ……  {pretty please?}

Do not forget that Shaklee also has a great income opportunity.  I would love to have you join my team!  Please email me if you would like additional details, or you can sign up with the Shaklee program right online.  Earn a few extra dollars in your spare time at home.  Plus, you automatically become a lifetime member of Shaklee, for FREE, when you start your Shaklee business!

Signature

Tuesday, April 17, 2012

The Cleaning Stage Begins

I am the quickest to admit {and very vocally for that matter} that I really do not like cleaning.  Do not get me wrong, I like things clean, I just do not like getting them there.

However, it is time for me to buck up and give in to the little cleaning voices that have been constantly buzzing in my ear.  The kitchen remodel has left our ENTIRE house overly dirty.  Our dust is dusty.

rosie_the_riveter

With that being said, there are two main things that bug me about cleaning products:

1.  They are expensive {unless you coupon, and in which case you can get cleaning supplies on the cheap every now and then}.

2.  They contain really harsh chemicals.  This point is the one that bugs me the most.  Given the amount of cleaning products I am going to be using {and breathing in}, I would prefer them not to be riddled with massive amounts of chemicals.

So, I set out to find alternate, more “green”, solutions.  What I found was that not only are there great, more natural, alternatives to those chemical-based cleaners we are all accustomed to, I can make most of the cleaning products I need with things I already have on hand!

I did find some general advice in regards to making your own cleaning products {things you should know before you mix your first batch of baking soda}.

1.  Do not use recycled food containers to store the cleaners.  Someone in your family may mistake them for something to eat or drink.

2.  Prepare only what you will use for six months – some formulas will start to lose their efficiency after this point.  The exception being cleaners that use fresh lemon juice – these should be used or tossed within a day.

3.  The Environmental Protection Agency sometimes suggests bleach for mold removal, but mixing bleach with acids, ammonia or anything containing them creates a toxic gas.  For the safety of myself {and the people reading this}, I have not included bleach in any of the recipes below!

woman-cleaning

For the Kitchen and Bathroom:

Spray Disinfectant: Instead of bleach, make your own disinfectant by mixing 2 cups of water, 3 tablespoons of liquid castile soap, and 20 to 30 drops of tea tree oil.

Stains and Mildew:  Spray or douse with lemon juice or vinegar. Let sit a few minutes, then scrub with a stiff brush.

Grease Cutter:  Wearing gloves, use a funnel to pour 1 tsp. washing soda, 2tsp. borax, 2 tbsp. distilled white vinegar, 2 1/2 cups hot water, 5 drops lavender essential oil, and 7 drops lemon essential oil into a spray bottle.  Shake then add 1/4 cup liquid castile soap and shake again.  Spray onto surface {walls, countertops, etc} and wipe with a damp sponge.

Tub and Tile Scrub:  Using a funnel, pour 2 tsp. borax, 1/2 tsp. liquid castile soap, and 1/2 cup distilled white vinegar into a spray bottle.  Shake well to mix.  Wearing rubber gloves, spray surfaces scrubbing with a  sponge as you work.  Rinse with water.

Oven Cleaner:  Coat the inside of your dirty appliance with a paste made from water and baking soda. Let stand overnight. Then, wearing gloves, scour off that grime. Make spotless with a moist cloth.

Clogged Drains:  Pour 1/2 cup of baking soda into the problem drain, followed by 2 cups of boiling water. If that isn't doing it for you, chase the baking soda with a 1/2 cup of vinegar and cover tightly, allowing the vigorous fizzing of the chemical reaction to break up the gunk. Then flush that with one gallon of boiling water.

Dishwashing Soap:  {Note, not for the dishwasher appliance, but for regular old-fashioned hand washing}  Using a funnel, pour 2/3 cup liquid castile soap, 3 tsp. glycerin, 5 drops tree tea oil, 20 drops lemon oil, an 1 1/3 cup water into a bottle.  Shake well to emulsify.  Although this formula will not suds up as much as we are used to {with Dawn, for instance}, it is definitely effective!  You can also use this to clean your countertops as well.

Automatic Dishwasher Detergent:  While wearing gloves, mix 2 cups washing soda, 2 cups borax, and 25 drops grapefruit essential oil into a bowl.  Stir with your hands and eliminate clumps.  Transfer powder to a plastic container.  Use 2 tbsp. detergent per wash and add 1 tsp. vinegar to the rinse cycle to prevent spots on silverware and glasses.

Toilet Bowl Cleaner:  Pour 1/2 cup baking soda directly into the toilet bowl then add 10 drops tea tree essential oil then add 1/2 cup distilled vinegar {IN THIS ORDER}.  Let the water effervesce for several minutes then scrub bowl with brush.  Flush.

Floor Cleaner:  Add 1 cup distilled white vinegar and 1 capful liquid castile soap to bucket then add hot water {stopping about 7 inches from the top}.  Swish with mop to mix.  Wring out mop and wash floors {do not get them too wet}.  Let them air-dry {no rinsing required}.

340x_shutterstock_57626353

For the House:

Windows:  Using a funnel, pour 3 cups water, 2 tbsp. rubbing alcohol, 1/4 cup distilled white vinegar, 5 drops lavender essential oil, and 1/2 tbsp. liquid castile soap into a used spray bottle and shake to mix. Squirt on, then scrub with newspaper, not paper towels, which cause streaking.
If you're out of vinegar or don't like its smell, you can substitute undiluted lemon juice or club soda.

Spot Carpet Cleaning:  Mix 1/4 cup liquid soap or detergent in a blender with 1/3 cup water. Mix until foamy. Spray on carpet, then rinse with vinegar.

Carpet Deodorizer:  Sprinkle baking soda or cornstarch on the carpet or rug, using about 1 cup per medium-sized room. Vacuum after 30 minutes.

Cleaning Hardwood Floors:  Whip up a solution of 1/4 cup white vinegar and 30 ounces of warm water. Put in a recycled spray bottle, then spray on a cotton rag or towel until lightly damp. Then mop your floors, scrubbing away any grime.

Laundry Detergent {HE friendly}:  Wearing gloves, mix 1/2 cup washing soda, 1/2 cup borax, 1 bar lavender castile soap {grated}, and 1/4 cup baking soda to air-tight container.  Cover and shake well.  Use 3 tbsp. detergent per load.

Furniture polish:  Using a funnel, pour 2 tbsp. olive oil, 1/4 cup distilled white vinegar, and 1/4 tsp lemon oil {or fresh lemon juice} into bottle.  Shake well to emulsify.  Squirt polish onto microfiber cloth and rub onto finished wood furniture.  Always go with the grain and evenly distribute polish.  Remove any excess with clean cloth.

Painted Wall Cleaner {meant for use on painted walls to remove a variety of marks, including crayon}:  Using a funnel, add 2 tbsp. borax, 3 cups warm water, 1/2 cup distilled white vinegar, and 6 drops grapefruit essential oil into a spray bottle.  Shake then add 1 tsp. liquid castile soap and shake well to emulsify.  Wearing gloves, lightly spray on walls and wipe with a damp sponge.  Rinse with a clean sponge as needed {work from the bottom up so streaks do not form}.

woman-cleaning-windows-378x297

Other Handy Uses for Pantry Items:

Cream of Tartar:  Along with baking soda, this baking staple is a faintly acidic tub and tile scourer.  Combined with lemon juice, it makes a mildly abrasive grout cleaner.

Hydrogen Peroxide:  Use it to pinch-hit for bleach on laundry stains.

Vodka:  Spritz the alcohol on ceramic bathroom tiles to remove pesky soap scum that cleaners didn’t remove.  Wait 10 minutes, then rinse clean.

Worcestershire Sauce:  Mix this condiment into your homemade furniture polish from above and apply to mask nicks and dents in dark finishes.